Post by Willow on Jan 16, 2007 17:40:10 GMT
Hosting Pictures is relatively easy, In this step by step guide we aim to give you all you need to know about how to host pictures.
Firstly:
Ask yourself this question - Do I have an account with the website called PhotoBucket??
If the answer is yes then please move to step 3 - if you have no idea what we're talking about go to step 1!!!!
Step 1: Type the following into the address bar in your internet explorer "www.photobucket.com" or "photobucket" into Google.
Once the site has loaded register with them - it is completely free, easy to use and has many benefits beyond hosting pictures for you, such as being able to send you prints, create slide shows so on and so forth....
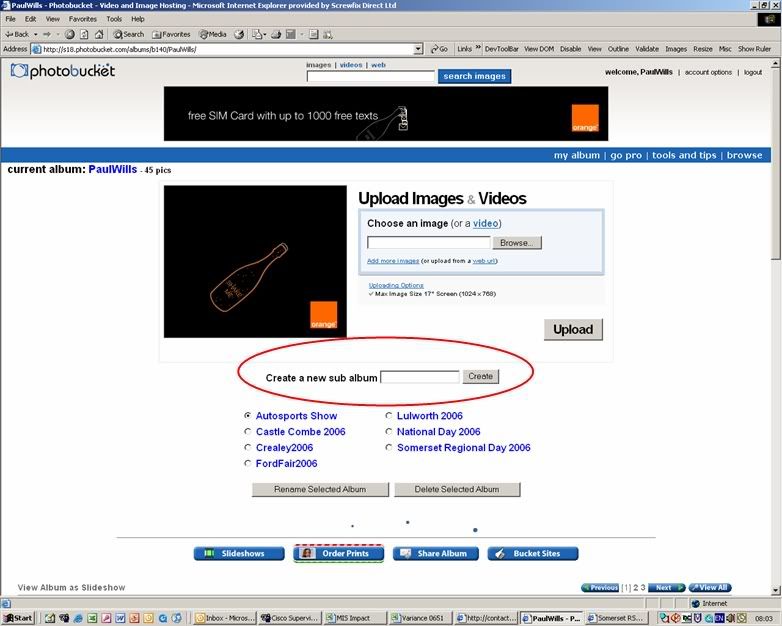
Step 2: Having registered with the site create yourself an album - this can be done by clicking in the 'create new sub Album' box, entering a name and then clicking create (see pic below) - call it what you like as you can see on my account i have the name of shows I've attended.
User with an account already may join us here! - If you already know how to upload pictures into your account jump to step 5!!
Step 3: To upload pictures is simple - click on the browse button (see below pic), find the picture you want to upload on your pc and double click it.
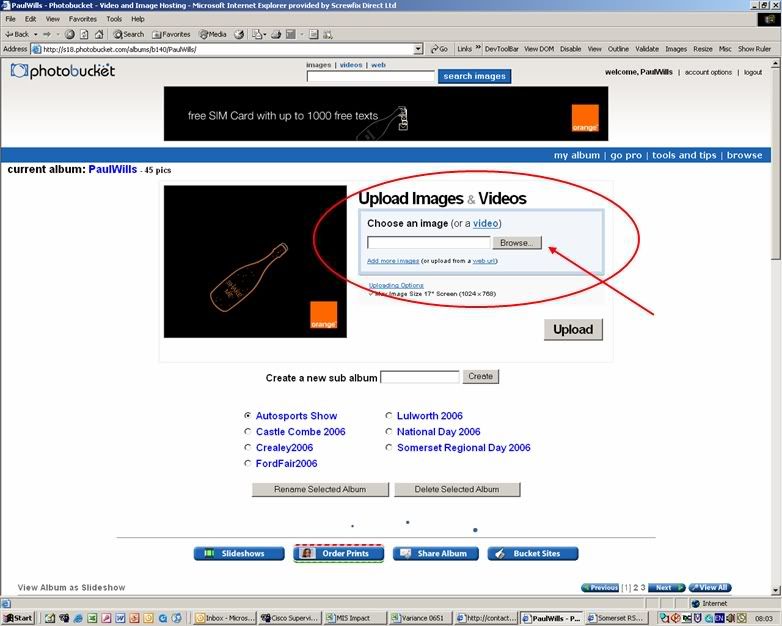
The picture name you want to upload will then appear in the upload bar in the circle in the pic above. Click Upload. Note: Depending on your internet connection speed and file size depends how long this process will take.
Step 4: Once the picture has uploaded you should be able to see it in a thumbnail size view if you scroll down - you will be told when an image has been uploaded - see below pic.

Getting them On to the Somerset Site???!!!!!!
This is where those with an account already set up join us again! - If you already know how to do this then why you reading?! ;-)
Step 5: Ok - if you scroll down to view your uploaded pictures not only will you see a thumbnail view you will also see 3 lines below with writting you may not understand - pictured below in the circle.
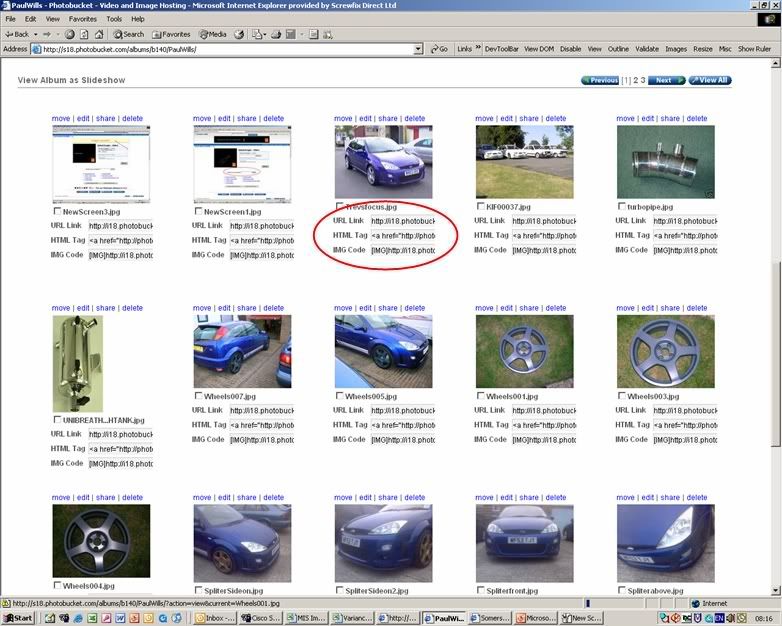
Your after the one named 'IMG CODE' - copy this line and paste it into the box where you would normally write your forum message - see last pic.

Step 6: Completion! when you submit your message to the forum the forum uses the code that you pasted into the message box as an address for your picture - everytime the message is opened the forum goes to the address and returns on screen the picture at that address.
Hopefully this was useful and simple enough to do. If you are still experiencing problems post up the issues and we will attempt to help you all.
regards
The Web Team
Firstly:
Ask yourself this question - Do I have an account with the website called PhotoBucket??
If the answer is yes then please move to step 3 - if you have no idea what we're talking about go to step 1!!!!
Step 1: Type the following into the address bar in your internet explorer "www.photobucket.com" or "photobucket" into Google.
Once the site has loaded register with them - it is completely free, easy to use and has many benefits beyond hosting pictures for you, such as being able to send you prints, create slide shows so on and so forth....
Step 2: Having registered with the site create yourself an album - this can be done by clicking in the 'create new sub Album' box, entering a name and then clicking create (see pic below) - call it what you like as you can see on my account i have the name of shows I've attended.
User with an account already may join us here! - If you already know how to upload pictures into your account jump to step 5!!
Step 3: To upload pictures is simple - click on the browse button (see below pic), find the picture you want to upload on your pc and double click it.
The picture name you want to upload will then appear in the upload bar in the circle in the pic above. Click Upload. Note: Depending on your internet connection speed and file size depends how long this process will take.
Step 4: Once the picture has uploaded you should be able to see it in a thumbnail size view if you scroll down - you will be told when an image has been uploaded - see below pic.
Getting them On to the Somerset Site???!!!!!!
This is where those with an account already set up join us again! - If you already know how to do this then why you reading?! ;-)
Step 5: Ok - if you scroll down to view your uploaded pictures not only will you see a thumbnail view you will also see 3 lines below with writting you may not understand - pictured below in the circle.
Your after the one named 'IMG CODE' - copy this line and paste it into the box where you would normally write your forum message - see last pic.
Step 6: Completion! when you submit your message to the forum the forum uses the code that you pasted into the message box as an address for your picture - everytime the message is opened the forum goes to the address and returns on screen the picture at that address.
Hopefully this was useful and simple enough to do. If you are still experiencing problems post up the issues and we will attempt to help you all.
regards
The Web Team